Tools: 3.2 Identify the Functions of Adobe Premiere Pro Interface Elements
By the end of this lesson I will understand how to the various tools in Premiere Pro. I have created a tools study sheet that you should review prior to taking the exam.
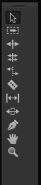
Tools Quick Tips:
Tools Quick Tips:
- The "Selection (arrow) tool" will be used 95% of the time. It allows you to select, move and trim clips on the timeline
- Use the "Track Select" tool for selecting all the clips on a track from a given point. *CC 2014 now has a forward and backward track selection tools.
- Use the "Ripple edit" tool when you want to trim a clip but don't want to leave a gap on your timeline
- Use the "Rolling edit" tool when you want to move the edit point between two clips without effecting the rest of the clips on your timeline
- Use the "Rate Stretch" tool for changing the speed of a clip on the timeline
- Use the "Razor" tool when you want to split a clip
- Use the "Slip" tool when you want to move a clips in/out points on the timeline without effecting the rest of the clips on the timeline
- Use the "Slide" tool when you want to move a clip on the timeline and adjust the length of the adjacent clip.
- Use the "Pen" tool for creating anchor points. You can also Ctrl + click on a rubber band to do this.